
This is How a HR Can Use Confluence to Improve Effectiveness
Use metadata wisely, and extensively. I will explain that in a moment.
We know human resource is far from being an easy task, the challenges encountered by HR professionals are multifaceted. Facing large numbers of employee profiles database, filtering resumes by stages of interviews while keeping candiadates well informed is just the tip of the icerberg.
Beyond profiles management, recruitment, there’s payroll handling. It's people's hard-earned cash. Ensuring timely and precise payments is not only a matter of financial integrity but also contributes significantly to maintaining a satisfied and motivated workforce.
With so many responsibilities on the shoulder, Confluence has offered features to allow HRs to organize the content and navigate them quickly, on the other hand, keep the data transparent and secure. However, there is some hidden magic we are going to show you today to turn all these chores into cheers.
Use Case A: Welcome to the recruitment center
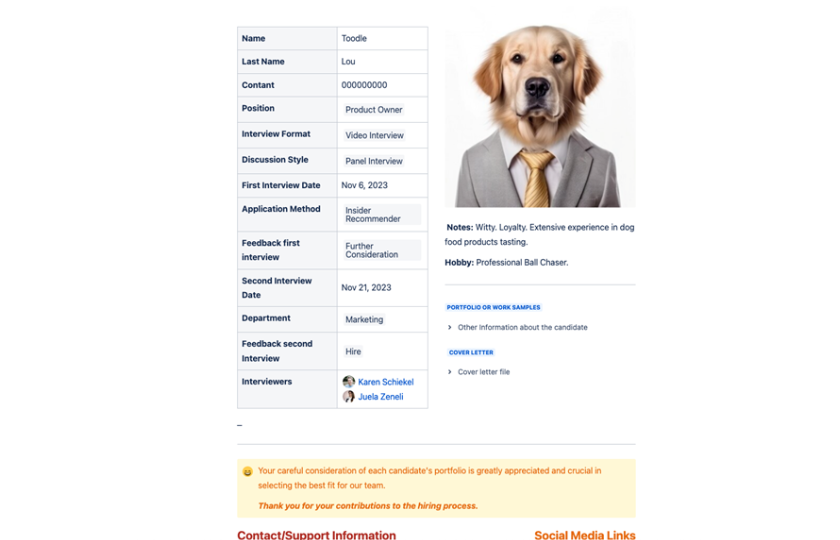
Meet Mr. Toodle Lou, our Product Owner hopeful. Below is his profile picture (we know it is not good to expose candidates’ pictures, but we had their consent, so…).

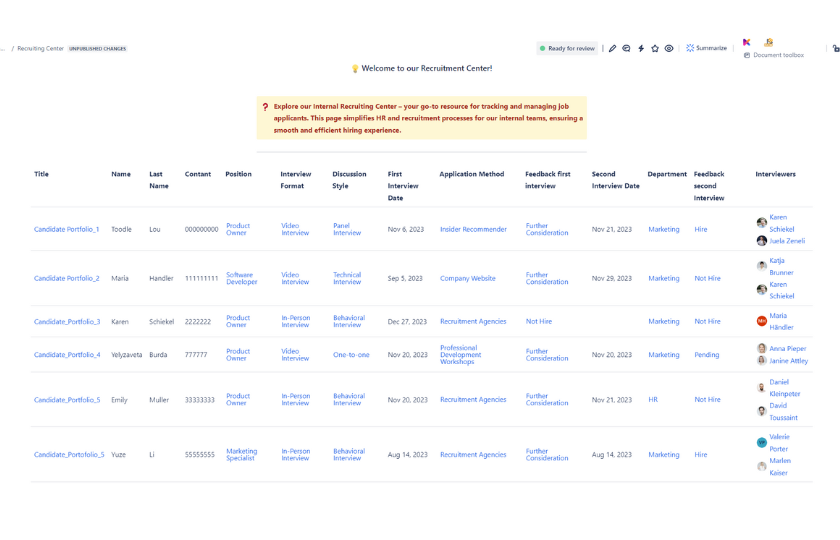
With 50+ resumes and 15 potential candidates in the mix, taking time to create a comprehensive report seems like a daunting task. But there is no need to do that in Confluence if you know how to extend the power of Confluence. Below is how Metadata has generated an overview (below) of all the candidates with just a click.
So how to turn this magic trick into a daily routine? Now we will show you step by step how to visualize this recruitment overview. Firstly, create your company’s own recruitment center in Confluence. As an admin, there are many ways to play around the content category. Go to Metadata for Confluence’s Settings – Content Category.
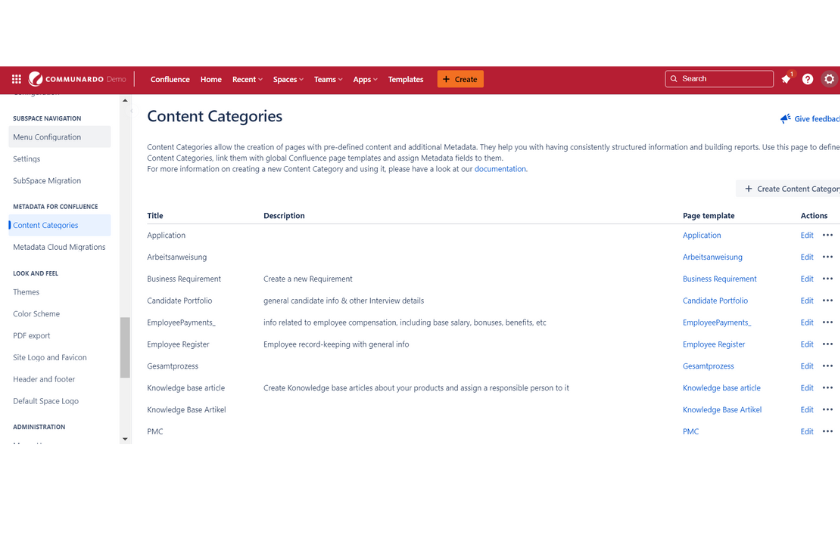
Then create a new content category here to enrich the Metadata Fields.
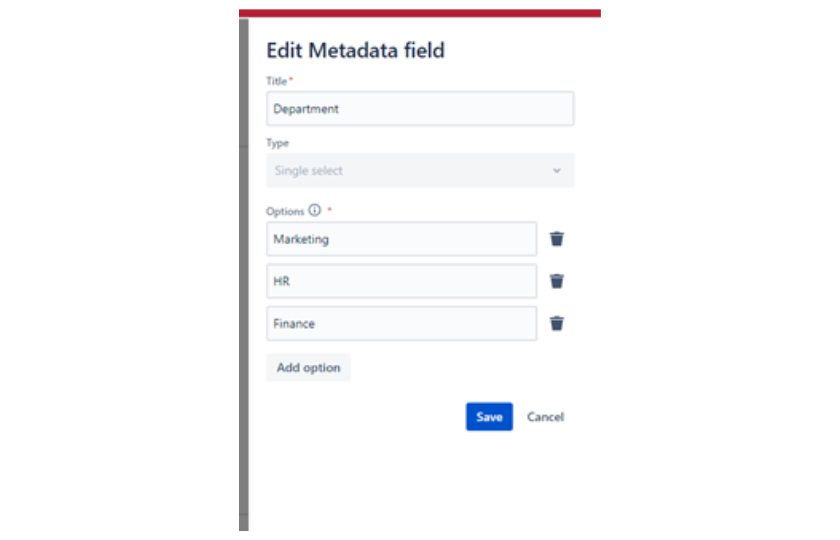
You can see from the example below, this is how you define which departments the candidates are applying for.
- Title and Options: You have the whole freedom to decide which category you would like to create and what are included in the category.
- Type: You can select the form of the data, this can be a as simple as a text, a specific date, multiple selects, link to a confluence page etc…
Don’t worry if you don’t have a concrete idea yet; you can always come back later to edit and delete the items. We have chosen a single select type for which Department the candidates are applying for, listing all for the options which are open for the interviews.
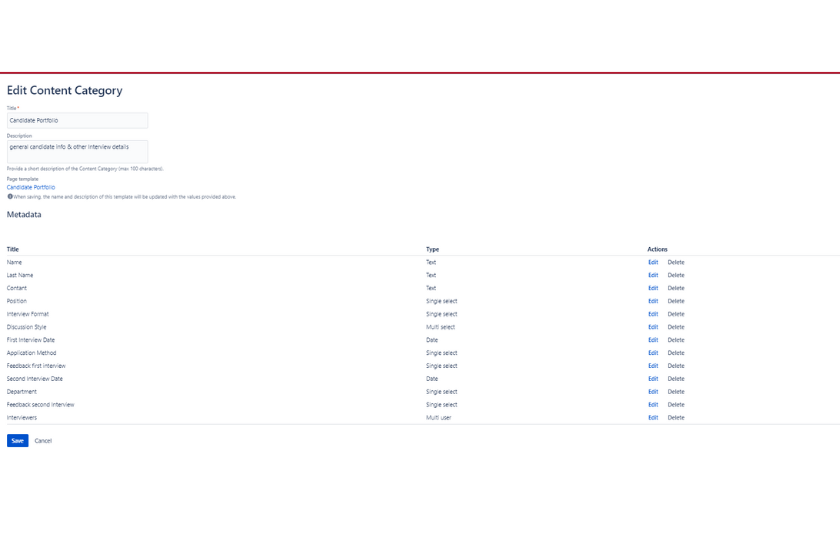
Repeat the creation until you have enough attributes you need. In this example, we have created the basic information of the candidates, what positions they have applied for, the dates of each interview they participated in, the hiring decision or not, and who had been involved in the interviews are all clearly listed here. Depending on your needs, you can also add additional notes from the interview.
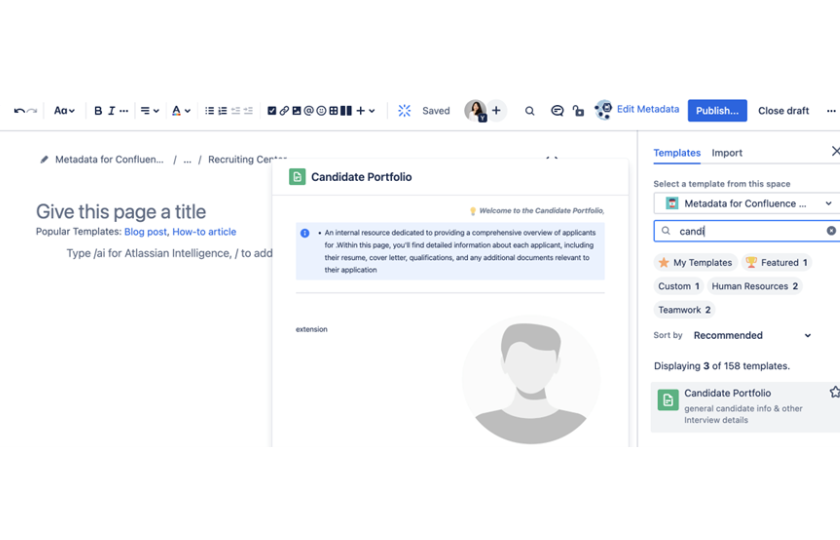
Once the basic formula is ready, then you can use it for any candidates’ portfolios. Create a new page, and find the template you just created “Candidate Portfolio” (as shown below):
After selecting the template, you have the a prefilled marco generated for you. (As shown below)
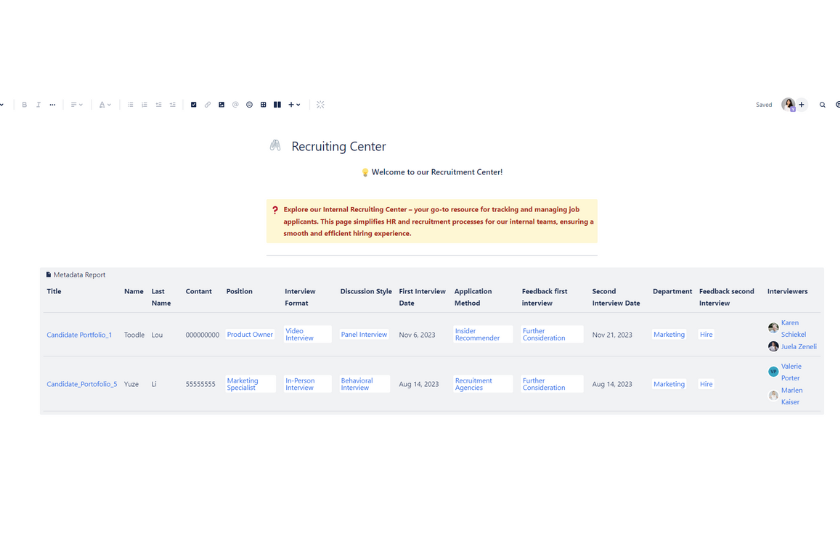
The same goes for the other candiates. This is a very organised way to have each candiate’s information well-documented in the same format. It is not only maintaining the consistency but also amazing because you could automatically generate an overview of all of the candiates without manully creating an additional chart again (shown below). Simply go to Report Metadata Macro, select the Content Category which you wanted to generate a report. Click Save and it will show the magic. The text are hyperlinked, which means all the content are well-connected. You can always track the candidate and interview details in the links.
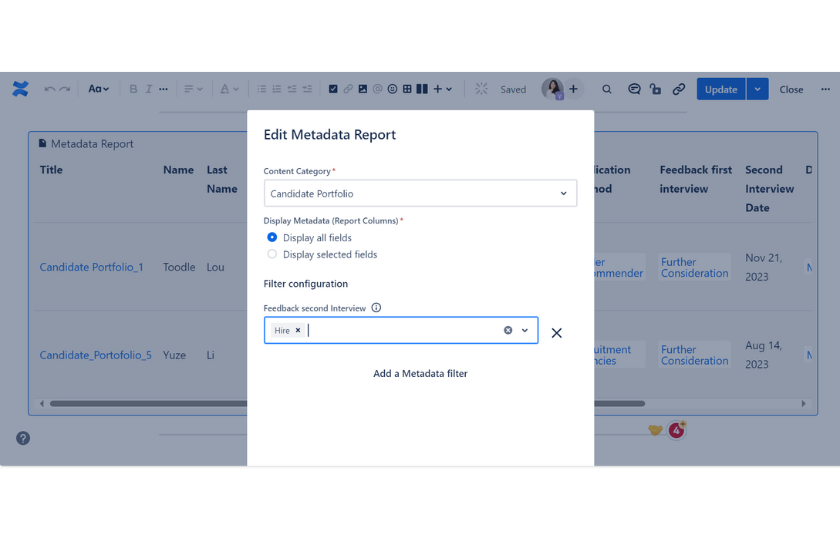
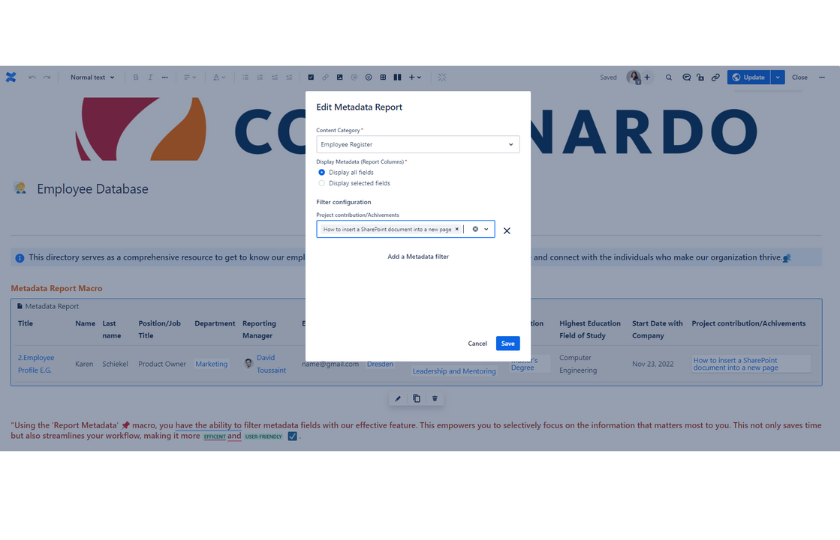
Having too many candidates and not sure which are the ones who had passed the second interview? No problem, simply click go to edit the Report macro and then you can filter the configuration with Feedback second interview as “Hire”.
Use Case B: It’s time to talk about payment
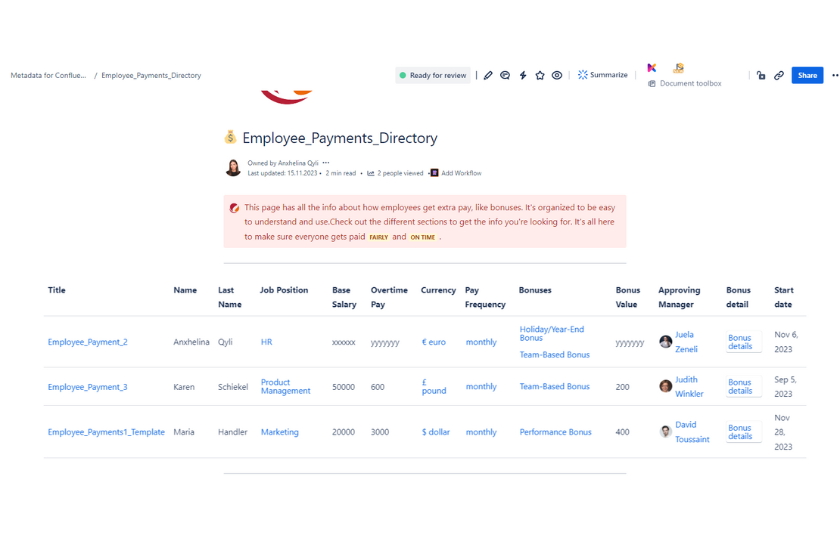
To have an overview of the employee payment is also simple as you follow the instructions.
Step 1: Log in as an adminitrator, go to the Metadata for Confluence settings – content category, create the Employees Payment Directory as a category, and start adding the new metadata fields such as Title, which is page link type, linking to specific employee profile page; Name; Job Position; Base Salary; Overtime Pay; Currency; Pay Frequency; Bonuses; Bonus Value; Approving Manager; Bonus Detail; Start Date etc.
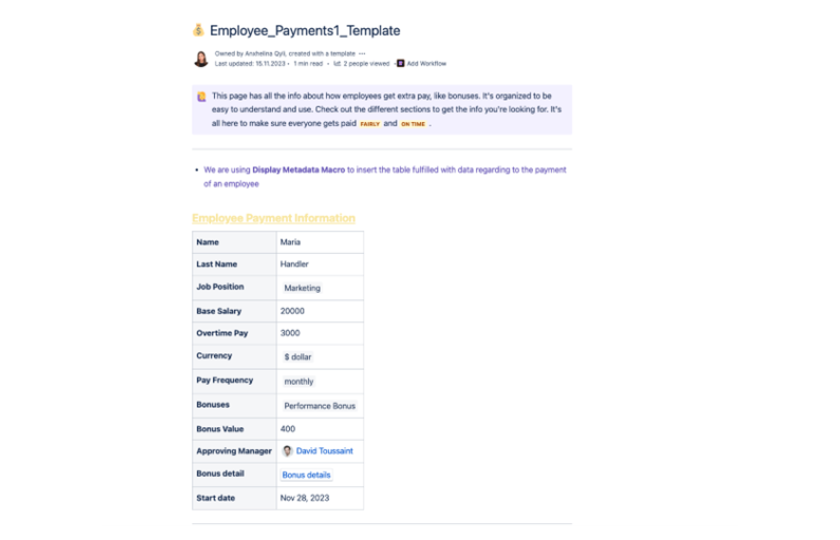
Step 2: Click create -page on the top navigation bar. Find Template - Employees Payment Directory (the one you just created). Then we use Display Metadata macro to insert the table fulfilled with data regarding to the payment of an employee. (Displayed as below)
Step 3:
Use the Report Metadata macro, you have the ability to filter metadata fields with our effective feature. This empowers you to selectively focus on the information that matters most to you. This not only saves time but also streamlines your workflow, making it more efficient and user-friendly.
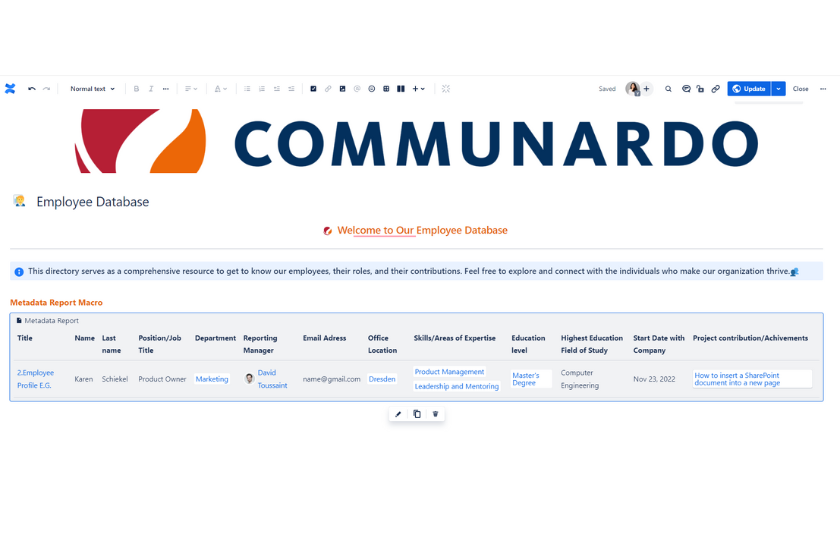
Use Case C: Employee Database
Step 1: Log in as an adminitrator, go to the Metadata for Confluence settings – content category, create the Employee Database as a category, and start adding the new metadata fields such as Title, which is page link type, linking to specific employee profile page; Name; Job Position; Department; Reporting Manager; Email Address; Office Location; Skills; Education Level; Highest Education Study; Start date with the company; Project Contribution/Achievements.
Step 2: Click create -page on the top navigation bar. Find Template - Employees Database (the one you just created). Then we use Display Metadata macro to insert the table fulfilled with data regarding to the basic information of the employee.
Step 3: Use the Report Metadata macro, choose the content category which you would like to generate the report overview. Then it will generate an overview as below:
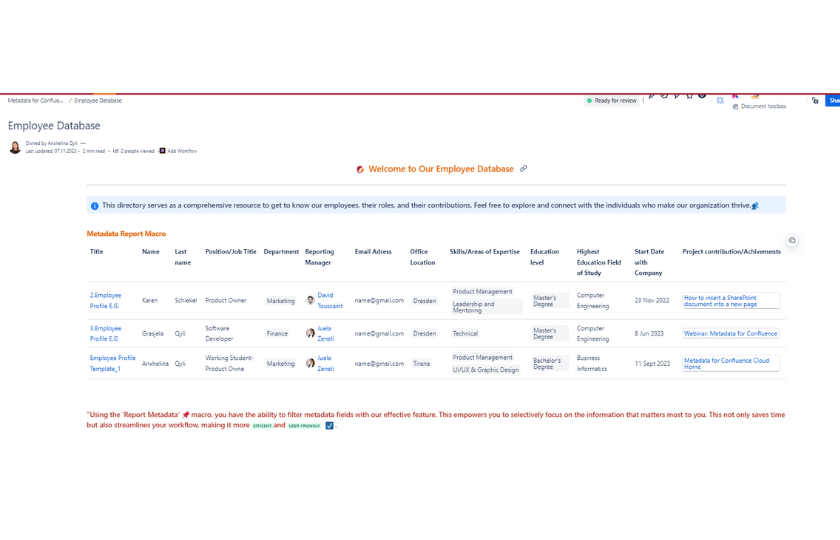
This information is for people to have a better understanding of the employee’s background, and for example, can easily filter someone who is specialized in UI design. Also, for the project contribution part, it is quick to find out the people who have worked on certain projects, and the relevant documents to that project. Go to edit the Metadata Report, and then you could select the filter configuration, in this case, which project they were involved in.
And there you have it, from recruitment mayhem to payroll wizardry and the HR crystal ball of employee databases, you now possess the magic wand to navigate the complexities with ease. So, let your HR playdate with Confluence begin – where tasks are a breeze, data is organized like a dream.